Most photographers have extensive catalogs of their work. After a couple of years of shooting, the digital files start piling up. Organizing your photos is the answer, but how do you do it? What if you want to find that excellent shot of the eagle, or that series of portraits you took on the beach in Oahu? You can use a photo organising software, that might help you get started.
Inputting photo data is, unfortunately, a lot like bookkeeping. It's a vital part of a photography business, but it's not much fun. As such, it gets put on the back burner all too often.
It doesn't have to be like that, though. Most advanced photo editing and cataloging programs have automated keyword features. It's fast and painless to input a lot of the critical data. If you can get in the habit of doing it at each upload, you'll find your entire collection searchable and ready to sell in no time. Do read our guide on how to start your photography business, designed both for amateur photographers as well as the pro photographers who want to refresh their photography business plans.
What is Metadata?
Photo metadata is information that is stored in a file that is not typically visible to the end-user. For photography, this means that you can save all sorts of written data, which you can use to label or categorize your images. Photoshop, Lightroom, and most operating systems allow you to view and edit this data.
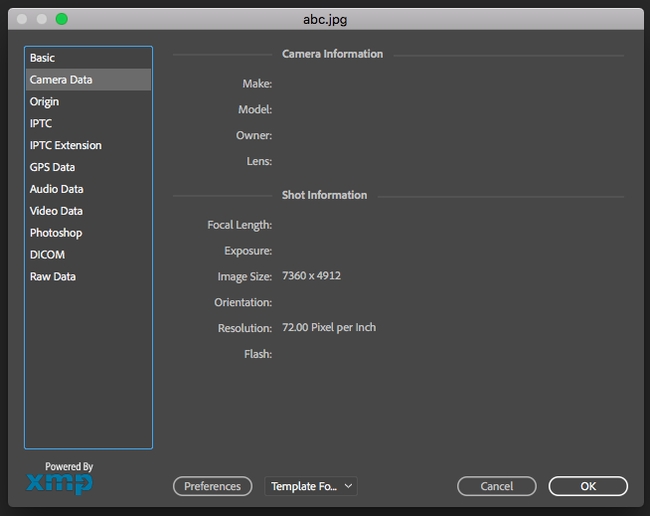
All photos have some already attached. Your camera automatically writes a lot more information than you may realize. It stores the date and time, the camera model and photograph settings. But photographers can add other useful details, like the exact shooting location, copyright info, titles, and descriptions.
One important thing to realize is that the data stays with your photo forever. If you use a photo-sharing site like Flickr or 500 Pixels, your data can help users find it and other examples of your photography.
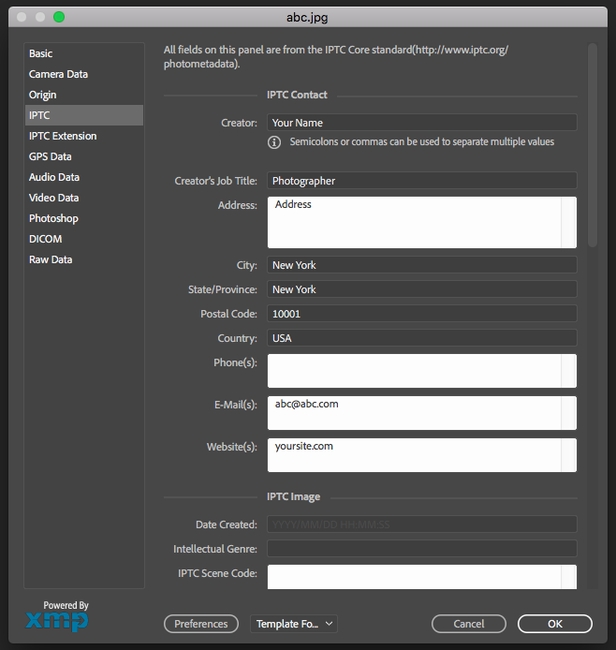
That also means that it can help you maintain your rights to the photo. You can include your website or email address in the data, so that photo editors may contact you should they want to use it. You can also put what sort of license you are sharing the image under.
Formats of Metadata
Over the years, different formats have been introduced as computer programs have gotten better and better at handling digital image catalogs. In the beginning, data was limited to just camera settings and basic information. But as collections got bigger, so did the options for photo metadata fields.

EXIF
Exif stands for Exchangeable Image File Format. This is the most commonly used type of file data since it is usually stored directly from your camera. Depending on your camera settings, it might also include geotagged location information from your camera's GPS receiver.
The most common fields used in the EXIF data are the camera make and model, the lens model, and the shutter speed, ISO, and aperture combination used.
IPTC Photo Data
The International Press Telecommunications Council (IPTC) data is another format that can be used in your files. It has become more and more common in photo editing programs. It bridges the divide between the image creating photographers and the image consuming photo editors.
The most significant difference that sets it apart from EXIF data is that the user inputs the IPTC data after the image has been created, whereas EXIF is created along with the image.
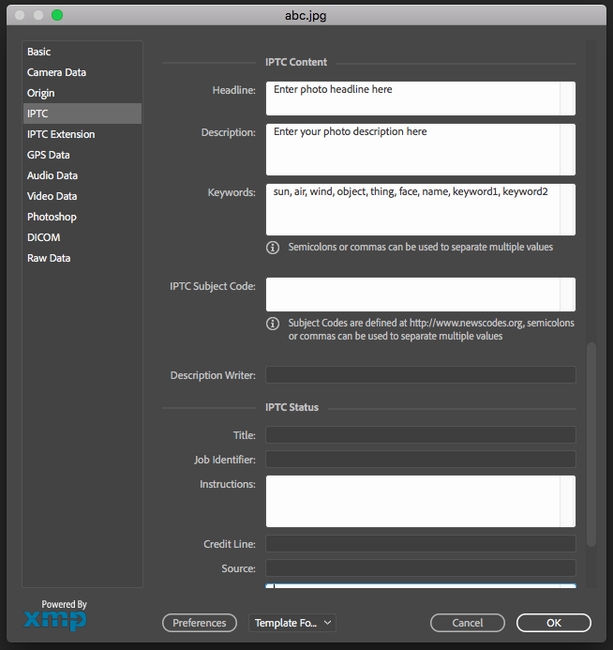
The advantage is that IPTC photo data can include specific titles and descriptions. It can also include the creator's name and contact information and even licensing details. Once a photo is added to an editor's collection, they will have access to all of this data and be able to add their own information to it. For example, they may want to write the terms of the license or put in where and when they published the file.

IPTC Extended
A group of data fields can be added to a photo to extend the IPTC data. A lot of these fields have specific purposes, but a few of them are of interest to content creators.
For example, there is a field to input the details of any artwork that might be pictured. You can also enter the ages of models used in the pictures, and whether or not you have releases for them. You can even input a reference number to help you find the release if you need to. The same goes for property releases.

XMP Data
The Extensible Metadata Platform is used by Adobe Lightroom and other programs. It's the latest data format, and the benefit is that it isn't as constrained as the other types.
Lightroom and other modern cataloging programs allow you to manipulate and edit your images in a non-destructive way. They do this by saving the changes you make into a separate XMP file, so the original file goes untouched. The advantage of the XMP data is that it can store unlimited information.
The disadvantage, especially when compared to EXIF and IPTC, is that it is program-specific. If you make changes to a file and then send the original to a colleague, they won't be able to see the changes unless they are using the same software and have access to the same XMP file.
For this reason, photographers usually don't think about XMP in the same way. It is a similar form of data, but its end use is not the same. XMP is sort of the RAW file format of data. Most photographers will use Lightroom or their catalog program to edit the RAW image files and perfect their EXIF/IPTC information, and then let Lightroom export that information into a new file in a universal format (.tif or .jpg).
How to Make Photo Data Work For You
There are probably as many ways to use this data as there are photographers. Many photographers go their entire careers without touching it, and that's fine for them. Photographers that regularly work with photo editors may get in the habit of adding a few items, or maybe they let Photoshop or Lightroom add it automatically.
But many photographers, even hobbyists, can benefit from using data inside of their own catalog process. Who hasn't spent hours looking for one particular photograph taken years ago?
Tagging and keywording photos is hardly a fun endeavor. The trick is to do it as automatically as possible. A lot of things can be automated with high-end programs like Lightroom. You can set it to add your name and copyright information automatically. You can also use bulk tasks to add keywords and locations. You might want to have a look at our list of Top Lightroom Presets that allow you to edit, organize, store, and share your photos across any device - mobile, web, or your desktop.
One of the best ways to automate your workflow is to program keywords into Lightroom before importing the images. On the import dialog panel, there is an option for keywords. Here, you can add a lot of the IPTC data you might want to set. It's the single fastest way to add keywords and creator info.
For photo-specific data, another handy tool is the spray paint function. The spray paint tool is located at the bottom of the screen when viewing your catalog in the grid layout. This enables you to "spray" data right to any files you "paint," quickly and easily. The spray paint tool will allow you to put in specific keywords or apply a data preset if you have set it up prior.
Photo Data Points to Consider
If you plan on selling your photos or you want to help buyers find them online, it's essential to take your data inputting to the next level.
When writing IPTC data to your files, keep in mind the final user. One step is to help eventual buyers use your photos and remember who you are. This ensures that if they need to, they can find you for additional licenses and additional images or assignments. Remember, some publication businesses have a high turn over rate. Your contact might not work there forever. So having a solid IPTC contact data field makes you easy to find.
But this data can also help you find those buyers to begin with. If you're selling online to stock agencies, many of their import programs will auto-populate with the files' existing EXIF and IPTC data. This is an invaluable time-saver if you're uploading to multiple platforms as many stock photographers do.
Photos on sharing sites can also be found with the data. The websites often use the data to populate the website, and doing so means that standard search engines can find your photos. The result is that the best practices in using data are also the best practices for keywording.
Titles
Main image titles should not be fluffy and artistic. If it's a picture of a cute dog playing in the morning dew, it shouldn't be titled "Sunrise Dancer." That's fine for your personal purposes, but if you want to sell the photo, you should try something more like, "A cute wire fox terrier puppy plays in the morning dew at sunrise."
With this in mind, buyers can now find your photo easily with keywords they're likely to use. They'll see your picture under "puppy playing" or "puppy at sunrise." Since the title uses the word puppy, you'll want to make sure your description field includes other terms that will be used like "dog" and "sunset."
The more significant point here is that keywording isn't just for the keywords section. Making your images understandable and clearly identifiable should be the goal of each data field.
Descriptions
The description field is often called the caption field. It allows you to use some creative writing to describe the photo, but the trick is not to get too creative. The goal is a keyword-loaded descriptive caption that lays out precisely what is in the photograph.
Don't forget to include colors too. For example, "A small tan and black dog frolics and jumps across a wet, bright green lawn at sunset.
Writing great portfolio content is not about creating eclectic prose. It is about writing useful content that ‘speaks’ to your intended audience. Here is an article on How to write great content for your portfolio website. You may also want to take a look at some great photography portfolio blogs for inspiration.
Use Common Phrases
One trick of the trade is not to limit yourself to individual words. Use Google as a tool to discover what people are searching for when they are looking for what is in your photo. Don't just include individual words but strings of words and phrases, too.
Tag Your Location Accurately
One of the easiest ways to sell photos online is to have easy to find images of specific locations. But for this to work, you've got to help buyers find the pictures they are looking for.
That means you need to be very specific when labeling the image. All images should include a city, state, and country. If there are other descriptive titles for the area, like the Blue Ridge Mountains, or the Appalachian Trail, they absolutely should be included as well.
If there are attractions or popular resort areas nearby, include those too. But it's better to include those in the general keyword column since you do not want any confusion about where the photograph was taken. The location information should be extremely accurate, while the keywords can be used to capture as many hits on searches as possible.
One last note about locations: it's not good enough to simply leave the EXIF GPS coordinates in place. This is a handy tool, especially on some sites that feature map locators, but most photo searching is still done by keyword searches. And not many people are doing keyword searches by inputting the latitude and longitude they're looking for! Take the time to write out the time and place, including landmark names and seasons.
Copyright Information
Once you give out your digital file, you give up your control over it. When this happens, the IPTC copyright fields will be your best friends. Here you can input your name and website so that buyers can continue to find you. It will also remind savvy purchasers that the photo was purchased from someone who still holds the rights to it.
Just like other fields, the copyright area requires some specificity. Be sure to spell out if you are an independent, agency, or staff photographer, and to make it clear who holds the copyright for the image. It's not always the photographer.
It's also essential to fill out the copyright notice field if you are releasing the photo or putting it on a sharing website. This is where you can write out exactly what rights have been licensed if any. If none have, be sure to state, "All rights reserved."
Tips for Keywords
Keywords are probably the most valuable part of the photo metadata. They help you find your photos, and they help customers find your photos. Keywording successfully takes a little practice, but it's not hard to do. All of the big stock photography companies have tips and tricks of the trade.
Keyword lists are separated by commas. They don't have to make grammatical sense; they are really just there for the search engine. As such, you need to train yourself to think like someone how is searching for your photo. Put yourself in their shoes. Go to Google and perform some trial and error searches. What keywords bring up photos most like yours?
Also, what did you try that didn't work? Don't discount the words you used that didn't bring up what you thought it would, because a photo editor might make the same mistake and then only have your photo to choose from. That would be very good for you.
You must read our Guide on SEO for photographers and creatives, for in-depth understanding on how to implement SEO for your website.
Conclusion
With the right software and a streamlined workflow, entering photo data is a quick and straightforward task that every photographer should be doing more of. It doesn't have to be like balancing your checkbook! Start by educating yourself on the various important fields to you and your photography business. Then automate as much as you can with software.
If you are thinking about selling stock images online, your success or failure will largely be determined by your keywording and photo data skills. But even outside of stock sales, every photographer is looking to broaden their base and get more exposure. Photo data is the way to do that, and it's free and easy to use.
As you make adding photo metadata a part of your workflow, it is important that you choose the perfect online portfolio solution to showcase your work. Make sure that the portfolio website builder you choose offers the flexibility, features, and ease-of-use you need to put together a professional portfolio website without requiring any coding knowledge.
Pixpa allows you to create a stunning website and take it to the next level with integrated blogging, e-commerce, and client proofing tools. On offer are several themes, display, and advanced styling options for galleries that are packed with powerful features. Have a look at some stunning portfolio website examples.
You can add images, videos/ HTML slides in your gallery. Pixpa allows you to import IPTC photo metadata. As you upload your images in any Pixpa gallery (website, eCommerce galleries, and client galleries), the system will automatically extract IPTC title, description, and keywords from your images and store them in your image Caption, Description and Keywords respectively. Enable search on your website to let visitors find the right images. Image captions also improve the search engine optimization of your website. Read more in detail on our Help article on the Import of IPTC data for image uploads.
Create your professional portfolio website easily on Pixpa in minutes without any coding knowledge.
Start your free trial now.


